8.2. The Node Class
Remember: A linked list is not a Node. Instead, it is a sequence
of connected nodes - each of which is a separate object. Typically,
a linked list object contains a Node reference to the head
(front) of the list along with a size variable indicating how
many items are in the list. Linking together Node objects is an
alternative way to store related data items.
Before diving into the concept of linked lists, we will explore the
Node class to better understand how it works. To do this, we will
trace through some code that uses the Node class shown in the UML
diagram below. This version of the Node class stores a String
reference along with a reference to another Node object.
Let's take at some code we might use to generate a shopping list with
three items using the Node class:
Node head = new Node("Cheese");
head.setNext(new Node("Bread"));
head.getNext().setNext(new Node("Milk"));
Here, we are storing our shopping list with three separate Node
objects instead of using an array. The resulting memory diagram looks
like this:
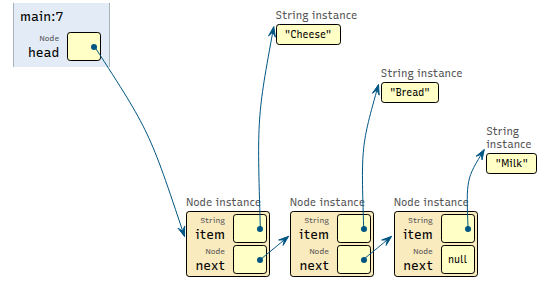
To store the list, we needed to create one Node object for
each item on the list - similar to how you would create one
index for each of the items in an array.
At first glance, you probably think the code is trickier, and that's
fair. However, that's only true when using the Node class
directly. Later in this chapter, we will see how to implement
the linked list class that hides the complexity from the
programmer so that using linked lists becomes as easy
as using an array.
Why have both linked lists and arrays? Well, each has their own benefits and drawbacks as we will see later in this chapter. Ultimately, which one you choose to store your data comes down to the type of application you are building and how you plan on using that data. More soon!
Test Yourself
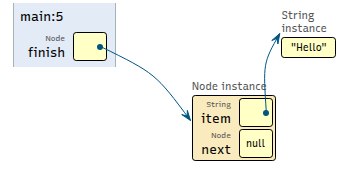
Using the Node diagram above, draw the complete memory map for
the code below.
Once you are done, check your answer against the step-by-step solution given in the dropdown box.
5Node finish = new Node("Hello");
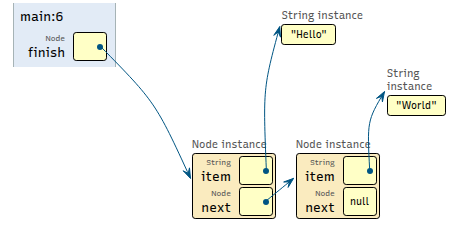
6finish.setNext(new Node("World"));
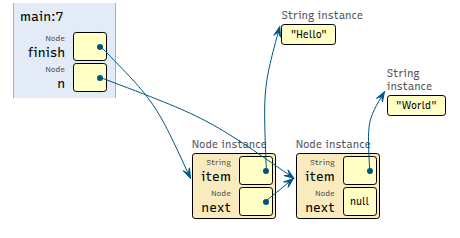
7Node n = finish.getNext();
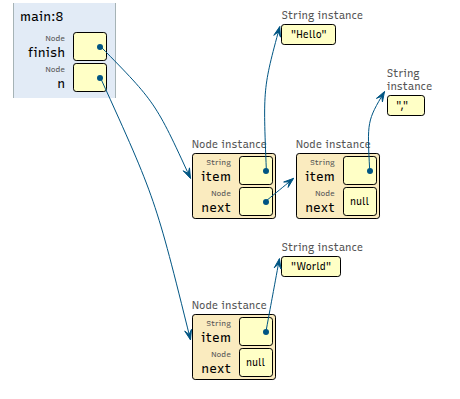
8finish.setNext(new Node(","));
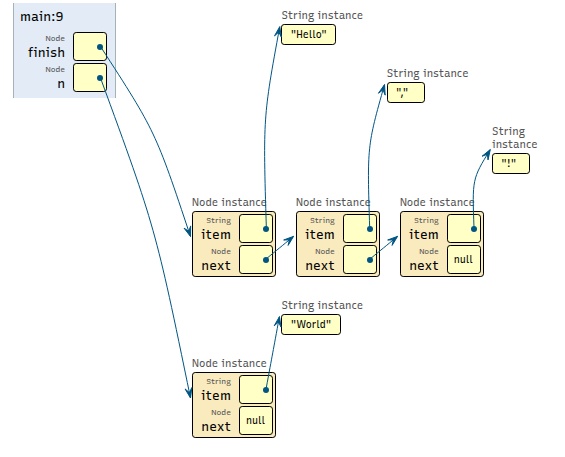
9finish.getNext().setNext(new Node("!"));
Solution - Open After Completing Exercise
Using your memory diagrams from the last step, write the output for the last seven lines of code. You should assume this code is in the same scope and has access to all the variables in your diagram.
1System.out.println(finish.getItem());
2System.out.println(finish.getNext().getItem());
3System.out.println(finish.getNext().getNext().getItem());
4System.out.println(finish.getNext().getNext().getNext());
5System.out.println(n.getItem());
6System.out.println(n.getNext().getItem());
7System.out.println(n.getNext().getNext());