8. ADTs and Lists Lesson
Lesson Objectives
Introduce linked lists and use them to implement
the Stack ADT.
The Node Class
The Node Class
Four Activities
Today, we are going to work through five group activities related to your recent readings on linked lists and ADTs.
Rapid Fire Review
In your groups, answer each of the following multiple-select questions. Each person should have their own copy of the questions and solution(s) in addition to what is on your exit ticket.
What is a linked list?
A collection of data stored in contiguous memory locations.
A sequence of objects where each object references the next.
A type of array where elements are accessed randomly.
A data structure that performs better in all situations than an array.
What does the
nextinstance variable in aNodeobject do?Stores the value of the
Node.Links to the previous Node in the sequence.
Links to the next
Nodein the linked list.Stores the index of the
Nodein an array.
Which of the following statements best describes a primary advantage of using a linked list over an array?
Linked lists are stored in contiguous memory, making access to elements faster.
Linked lists are easier to search than arrays.
Linked lists can grow dynamically without the need to reallocate memory.
Linked lists can only store string data types.
Why is a linked list considered an alternative to an array?
Linked lists and arrays have identical performance characteristics.
Both store collections of data but handle memory allocation and access differently.
Linked lists are always faster than arrays.
Arrays can only hold integer values while linked lists can hold any data type.
Code Tracing 1
In your groups, draw the memory map for the following code and then write the output for the print statements. Each person should have their own copy of the memory map in addition to the one on your exit ticket.
2public static void main(String[] args) {
3
4 Node node = new Node("Billy");
5 node.setItem("Susan");
6 node.setNext(new Node("Sally"));
7 node.getNext().setNext(new Node("Barry"));
8
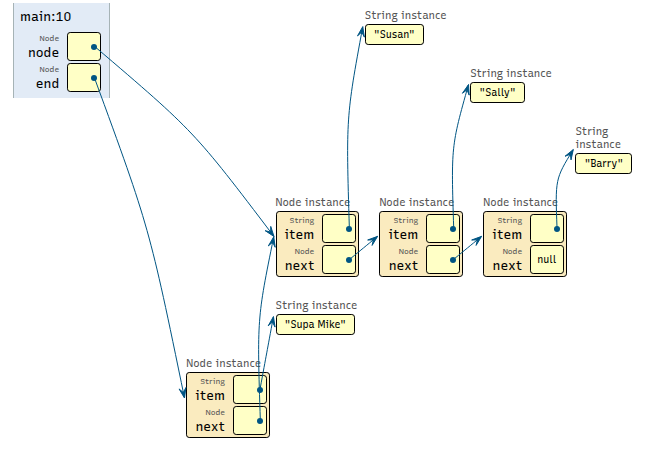
9 Node end = new Node("Supa Mike", node);
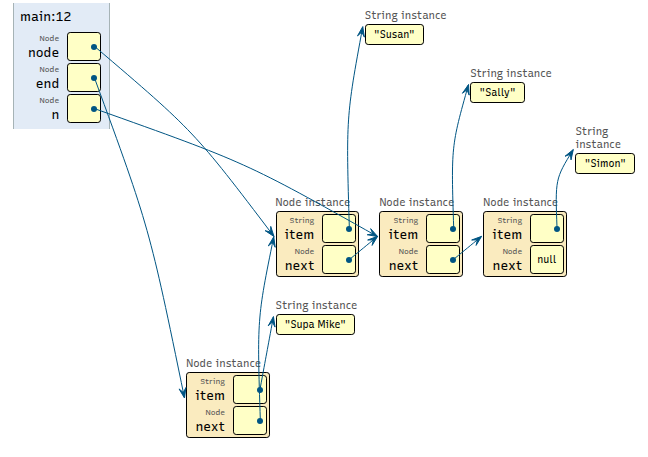
10 Node n = node.getNext();
11 n.setNext(new Node("Simon"));
12
13 System.out.println(node.getItem()); // Output 1
14 System.out.println(node.getNext().getItem()); // Output 2
15 System.out.println(end.getItem()); // Output 3
16 System.out.println(node.getNext().getNext().getItem()); // Output 4
17
18} // main
Code Tracing 1: Sample Solution
Sample Solution: First Part

Fig. 1 Code visualization for Code Tracing 1. Note: The debugger breakpoint is on line 5.

Fig. 2 Code visualization for Code Tracing 1. Note: The debugger breakpoint is on line 6.

Fig. 3 Code visualization for Code Tracing 1. Note: The debugger breakpoint is on line 7.
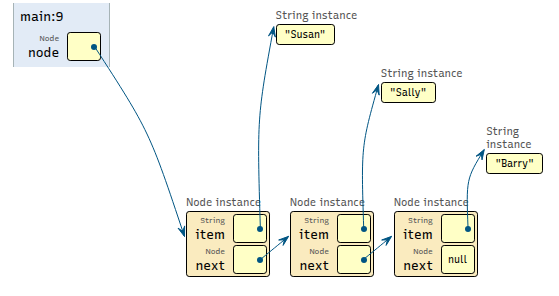
Fig. 4 Code visualization for Code Tracing 1. Note: The debugger breakpoint is on line 9.
Sample Solution: Second Part

Code Writing 1

In your groups, write the code to produce a linked list that looks like the one depicted in the memory map above.
Code Writing 1: Sample Solutions
Sample Solution 1
Note
The sample solution approaches the problem by repeatedly prepending nodes in the linked list.
Node head = new Node("third", null); // line 4
head = new Node("second", head);     // line 5
head = new Node("first", head);      // line 6

Fig. 8 Memory Map for Code Writing 1: Sample Solution 1. Note: The debugger breakpoint is on line 5. [code listing]
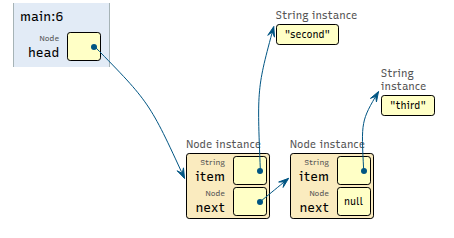
Fig. 9 Memory Map for Code Writing 1: Sample Solution 1. Note: The debugger breakpoint is on line 6. [code listing]

Fig. 10 Memory Map for Code Writing 1: Sample Solution 1. Note: The debugger breakpoint is on line 7. [code listing]
Sample Solution 2
Note
The sample solution approaches the problem by repeatedly appending nodes in the linked list. It does not scale well.
Node head = new Node("first", null);
head.setNext(new Node("second", null));
head.getNext().setNext(new Node("third", null));

Fig. 11 Code Writing: Sample Solution 2. Note: The debugger breakpoint is on line 5. [code listing]
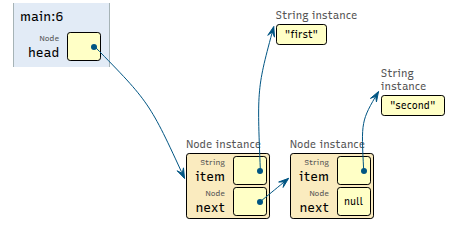
Fig. 12 Code Writing: Sample Solution 2. Note: The debugger breakpoint is on line 6. [code listing]

Fig. 13 Code Writing: Sample Solution 2. Note: The debugger breakpoint is on line 7. [code listing]
Sample Solution 3
Note
This sample solution does not match up exactly since it
introduces additional local variables (besided just
head) that were not in the original memory map.
Node first = new Node("first", null);
Node second = new Node("second", null);
Node third = new Node("third", null);

first.setNext(second);
second.setNext(third);

Node head = first;

Fig. 14 Code Writing: Sample Solution 3. Note: The debugger breakpoint is on line 5. [code listing]
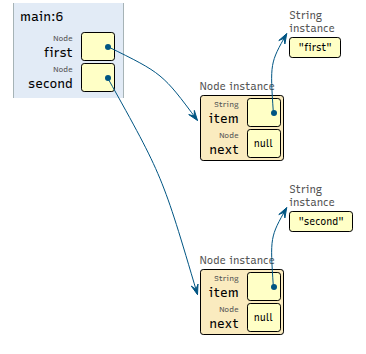
Fig. 15 Code Writing: Sample Solution 3. Note: The debugger breakpoint is on line 6. [code listing]
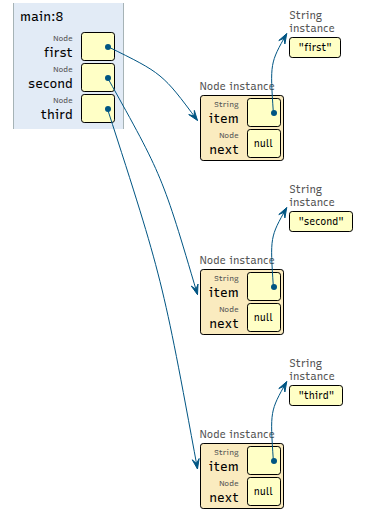
Fig. 16 Code Writing: Sample Solution 3. Note: The debugger breakpoint is on line 8. [code listing]
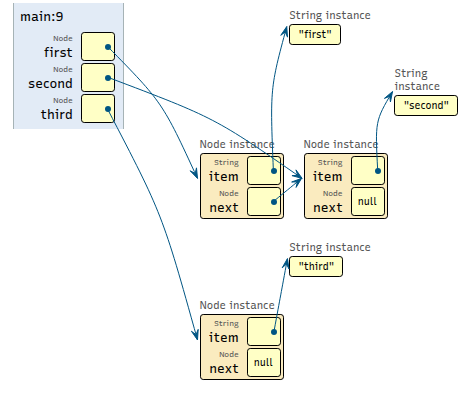
Fig. 17 Code Writing: Sample Solution 3. Note: The debugger breakpoint is on line 9. [code listing]
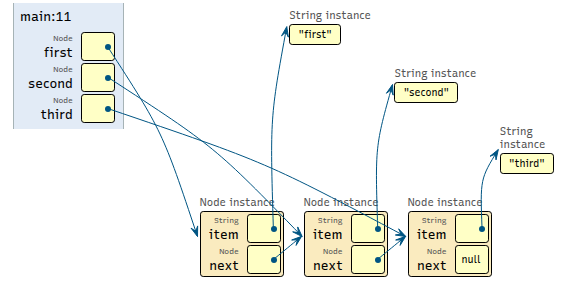
Fig. 18 Code Writing: Sample Solution 3. Note: The debugger breakpoint is on line 11. [code listing]
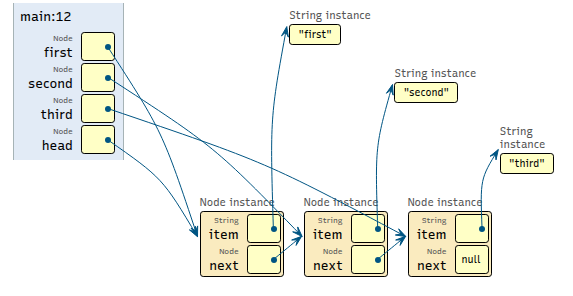
Fig. 19 Code Writing: Sample Solution 3. Note: The debugger breakpoint is on line 12. [code listing]
Sample Solution 4
Note
We do NOT reccommend this one! It works, but it is hard to read.
Node head = new Node("first", new Node("second", new Node("third")));

// Node head = new Node(
//     "first",
//     new Node(
//         "second",
//         new Node(
//             "third",
//             null
//         )
//     )
// );

Fig. 20 Code Writing: Sample Solution 4. [code listing]
Sample Solution 5
Note
This sample solution inserts the node for "second" last, but it still produces the same final result!
Node head = new Node("first");
head.setNext(new Node("third"));
head.setNext(new Node("second", head.getNext()));
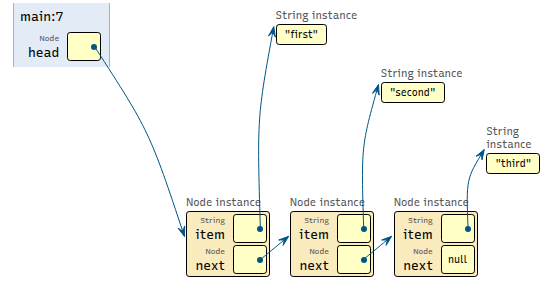
Fig. 21 Code Writing: Sample Solution 5. [code listing]
Code Tracing 2
Draw the memory map for the code below and write the output produced by the following code:
Node head = new Node("date");
head = new Node("cherry", head);
head = new Node("banana", head);
head = new Node("apple", head);

Node current = head;
while (current != null) {
   System.out.print(current.getItem() + " ");
   current = current.getNext();
} // while
Memory Maps
Note
The last two memory maps below show what memory looks like just before and immediately after exeuting the while-loop.
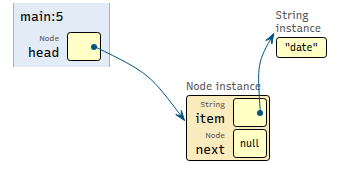
Fig. 22 Note: The debugger breakpoint is on line 5.
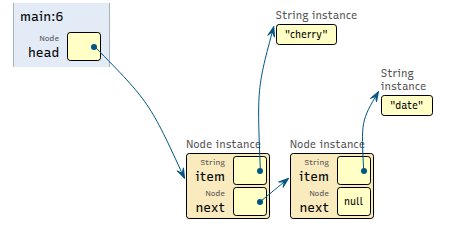
Fig. 23 Note: The debugger breakpoint is on line 6.

Fig. 24 Note: The debugger breakpoint is on line 7.
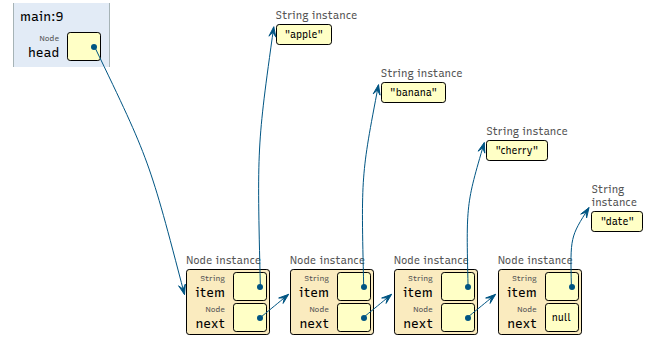
Fig. 25 Note: The debugger breakpoint is on line 9.

Fig. 26 Note: The debugger breakpoint is on line 10.

Fig. 27 Note: The debugger breakpoint is on line 14.
Solution

Code Writing 2
In your groups, write a method with the signature below. You do not need to rewrite the Javadoc comment.
 1/**
 2 * Returns a reference to the {@code Node} that can be
 3 * reached after traversing {@code numLinks}
 4 * many links starting at {@code node}.
 5 *
 6 * @param node the node where we begin the search.
 7 * @param numLinks the number of links to traverse.
 8 * @return node at {@code numLinks} links beyond {@code node}.
 9 */
10public static Node getNode(Node node, int numLinks) {
11    throw new UnsupportedOperationException("not yet implemented");
12} // getNode
Code Writing 3
Write a method called getItem that returns the item in the node
that is numLinks beyond the starting node (instead of a reference
to the node itself).
Can you write the method body in one line?
Implementing the Stack ADT
Implementing the Stack ADT
Getting Started
Warmup
Answer the following questions on your exit ticket:
What is an Abstract Data Type (ADT)?
A low-level description of a data structure's implementation.
A predefined class in the Java library.
A high-level description of the operations available on a collection of data.
A specific method for implementing data structures in Java.
How does polymorphism relate to ADTs in Java?
Polymorphism allows multiple ADTs to be defined within the same class.
Polymorphism enables the
Listinterface to be implemented by different classes, likeArrayBasedListandLinkedBasedList.Polymorphism is only applicable when using arrays as underlying structures.
Polymorphism is not used in conjunction with ADTs.
Why is it beneficial to have different implementations of an ADT like the
Listinterface?It allows the programmer to access more methods.
It simplifies the process of writing new code.
It eliminates the need for interfaces in Java.
It provides flexibility in choosing an implementation that is more efficient for the specific application.
Code Writing 1: Sample Solutions
C
B
D
What is a Stack?
We will implement the Stack ADT according to the following
specification:
Starter Code (for instructors)
Bundle
Execute the command below to download and extract the files:
sh -c "$(curl -fsSL https://cs1302book.com/_bundle/cs1302-stack-starter.sh)"
- downloading cs1302-stack-starter bundle...
- verifying integrity of downloaded files using sha256sum...
- extracting downloaded archive...
- removing intermediate files...
subdirectory cs1302-stack-starter successfully created
cs1302.adt: Stack interface and implementations.cs1302.test: Stack test code.Compile script is in the directory. It compiles everything and runs
StackTester.
Starter Code (for those not on Odin)
Execute the git clone command shown below to
download the files for this lesson into a directory named
cs1302-adt-lesson:
git clone https://github.com/cs1302uga/cs1302-adt-lesson.git
Starter Code (for students)
Execute the adt1302 command shown below on Odin to
download the files for this lesson using Git into a directory
named cs1302-adt-lesson:
adt1302
+ git clone https://github.com/cs1302uga/cs1302-adt-lesson.git
Cloning into 'cs1302-adt-lesson'...
remote: Enumerating objects: 46, done.
remote: Counting objects: 100% (46/46), done.
remote: Compressing objects: 100% (26/26), done.
remote: Total 46 (delta 12), reused 40 (delta 8), pack-reused 0 (from 0)
Receiving objects: 100% (46/46), 11.58 KiB | 697.00 KiB/s, done.
Resolving deltas: 100% (12/12), done.
UML (No Tests)
Unit Testing
The code below is a slightly modified test case
from our StackTester class.
 1public void unitTest() {
 2
 3   Stack stack = new OracleStack();
 4   stack.push("a");
 5   stack.push("b");
 6   stack.push("c");
 7
 8   // ...
 9
10} // unitTest
The code above could be the setup for many, separate unit tests. For each of the scenarios below, we would create a separate method (unit test) in our test class. What code could we add to the end of this method to test the following:
If our stack contains the correct number of elements.
If the correct value is at the top of the stack.
If the stack contains the correct values throughout.
In practice, these would be three separate test methods, even though they share the same test scenario.
UML (With Tests)
Part 1: BaseStack
Code Tracing
Draw a memory map for the code below on your exit ticket. Your diagram should include all variables (including instance variables) and objects created.
Stack stack = new ArrayStack();
Sample Solution

Inspecting the Tests
Important
If you do not have the cs1302-adt-lesson directory
that was downloaded in a previous part of this lesson,
then run the adt1302 command on Odin to
download it using Git.
Execute the following command on Odin within the
cs1302-adt-lesson directory
git checkout -b activity part1
With your groups, inspect StackTester.java
in the cs1302.test package and carefully
review the following methods:
newStackstackTest01stackTest02
On your exit ticket, answer the following questions about those methods:
What are these methods testing?
What methods will we need to implement to make sure we pass these tests?
Implementation
To pass the current set of tests, implement the following methods with your group:
Class |
Method |
Note |
|---|---|---|
|
default constructor |
Initialize instance variables appropriately. |
|
|
This a "getter" method without "get" in its name. |
|
|
Try calling the |
|
default constructor |
Do not forget to call |
Then, compile and run the code using the provided interpreter script:
./compile_and_run.sh
You should see "PASS" printed on the screen multiple
times. If you see "FAIL", don't panic, carefully read the
error message and update your code. Once it compiles and you
get all "PASS" messages from the tester, stage and commit
your work to Git and then merge into the main branch
with the following commands:
Warning
If you have placed Emacs into the background, then make sure
that you have saved any files under src that are currently
open to avoid accidentally adding backup files when adding
and committing using Git.
git add src
git commit -m "Finished part 1"
git merge part2
Part 2: ArrayStack Push
Code Tracing 1
Draw a memory map for the code below on your exit ticket. Your diagram should include all variables (including instance variables) and objects created.
Stack stack = new ArrayStack();
stack.push("a");
Solution

Code Tracing 2
Draw a memory map for the code below on your exit ticket. Your diagram should include all variables (including instance variables) and objects created.
Stack stack = new ArrayStack();
stack.push("a");
stack.push("b");
stack.push("c");
Solution

Fig. 28 This shows ONE way to implement the ADT. Note: The debugger breakpoint is on line 5.

Fig. 29 This shows ONE way to implement the ADT. Note: The debugger breakpoint is on line 6.
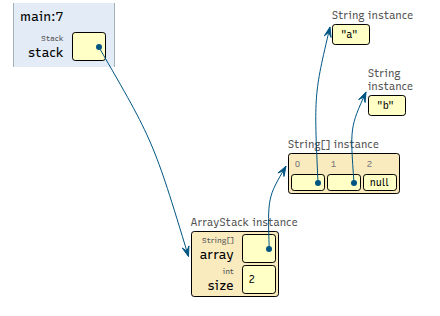
Fig. 30 This shows ONE way to implement the ADT. Note: The debugger breakpoint is on line 7.
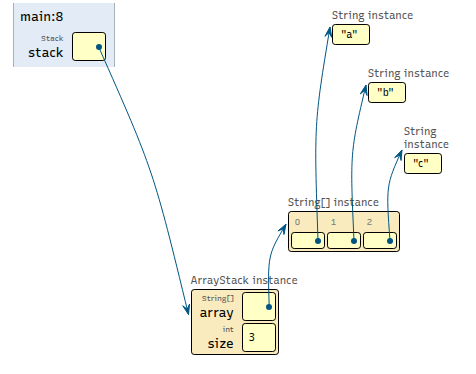
Fig. 31 This shows ONE way to implement the ADT. Note: The debugger breakpoint is on line 8.
Code Tracing 3
Draw a memory map for the code below on your exit ticket. Your diagram should include all variables (including instance variables) and objects created.
Stack stack = new ArrayStack();
stack.push("a");
stack.push("b");
stack.push("c");
stack.push("d");
Solution

Fig. 32 This shows ONE way to implement the ADT. Note: The debugger breakpoint is on line 5.
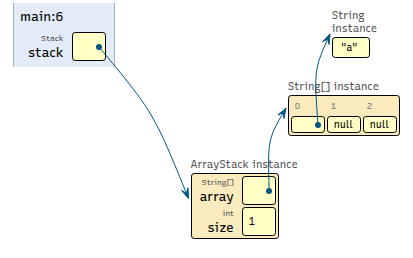
Fig. 33 This shows ONE way to implement the ADT. Note: The debugger breakpoint is on line 6.

Fig. 34 This shows ONE way to implement the ADT. Note: The debugger breakpoint is on line 7.

Fig. 35 This shows ONE way to implement the ADT. Note: The debugger breakpoint is on line 8.
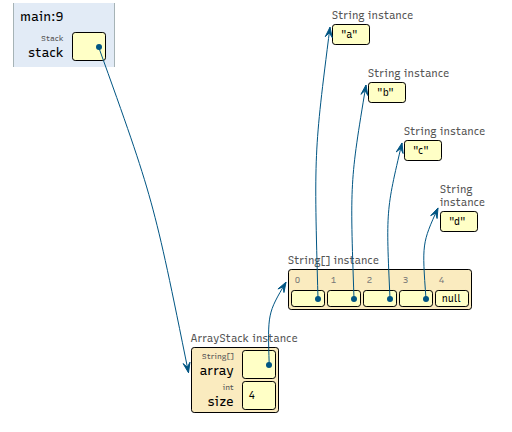
Fig. 36 This shows ONE way to implement the ADT. Note: The debugger breakpoint is on line 9.
Discussion Opportunity
Should element 0 be the top of the stack or should
the top be at the end of the array?
Inspecting the Tests
With your groups, inspect StackTester.java
in the cs1302.test package.
Carefully review the new methods (stackTester03
through stackTester05) and answer the questions
below:
What are these methods testing?
Why is
stackTest05needed?
Implementation
To pass the current set of tests, implement the following methods with your group:
In ArrayStack:
push
Then, compile and run the code using the provided script:
./compile_and_run.sh
You should see "PASS" printed on the screen multiple
times. If you see "FAIL", don't panic, carefully read the
error message and update your code. Once it compiles and you
get all "PASS" messages from the tester, stage and commit
your work to Git and then merge into the main branch
with the following commands:
git add src
git commit -m "Finished part 2"
git merge part3
Part 3: ArrayStack Peek
Code Tracing
Write the expected output of the following code on your exit ticket:
Stack stack = new ArrayStack();
stack.push("a");
stack.push("b");
stack.push("c");
stack.push("d");
System.out.println(stack.peek());
System.out.println(stack.peek());
System.out.println(stack.peek());
Solution
The output will be:
d
d
d
Inspecting the Tests
With your groups, inspect StackTester.java
in the cs1302.test package.
Carefully review the new methods (stackTester06
through stackTester08) and answer the questions
below:
What are these methods testing?
Can you think of any additional tests that might be beneficial?
Implementation
To pass the current set of tests, implement the following methods with your group:
In ArrayStack:
peek
Then, compile and run the code using the provided script:
./compile_and_run.sh
You should see "PASS" printed on the screen multiple
times. If you see "FAIL", don't panic, carefully read the
error message and update your code. Once it compiles and you
get all "PASS" messages from the tester, stage and commit
your work to Git and then merge into the main branch
with the following commands:
git add src
git commit -m "Finished part 3"
git merge part4
Part 4: ArrayStack Pop
Code Tracing
Draw a memory map for the code below on your exit ticket. Use the memory map from the last part as a starting point. Your diagram should include all variables (including instance variables) and objects created.
Stack stack = new ArrayStack();
stack.push("a");
stack.push("b");
stack.push("c");
stack.push("d");
System.out.println(stack.peek());
System.out.println(stack.pop());
System.out.println(stack.pop());
Solution
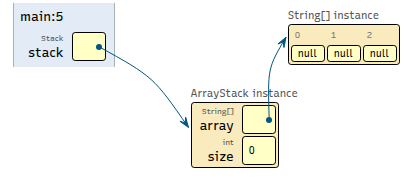
Fig. 37 Note: The debugger breakpoint is on line 5.

Fig. 38 Note: The debugger breakpoint is on line 6.

Fig. 39 Note: The debugger breakpoint is on line 7.

Fig. 40 Note: The debugger breakpoint is on line 8.

Fig. 41 Note: The debugger breakpoint is on line 9.

Fig. 42 Note: The debugger breakpoint is on line 10.

Fig. 43 Note: The debugger breakpoint is on line 11.

Fig. 44 Note: The debugger breakpoint is on line 12.
Discussion Opportunity
Should we mark the elements null within the array when we
remove from the stack?
Inspecting the Tests
With your groups, inspect StackTester.java
in the cs1302.test package.
Carefully review the new methods (stackTester09
through stackTester17) and answer the questions
below:
What are these methods testing?
Can you think of any other tests that might be beneficial to add?
Implementation
To pass the current set of tests, implement the following methods with your group:
In ArrayStack:
pop
Then, compile and run the code using the provided script:
./compile_and_run.sh
You should see "PASS" printed on the screen multiple
times. If you see "FAIL", don't panic, carefully read the
error message and update your code. Once it compiles and you
get all "PASS" messages from the tester, stage and commit
your work to Git and then merge into the main branch
with the following commands:
git add src
git commit -m "Finished part 4"
git merge part5
Part 5: ArrayStack Additional Testing
Inspecting the Tests
With your groups, inspect StackTester.java
in the cs1302.test package.
Carefully review the new methods (stackTester18
through stackTester20) and answer the questions
below:
What are these methods testing?
What other tests might be beneficial?
Implementation
To pass the current set of tests, make sure you
are throwing the appropriate exceptions within
your ArrayStack implementations.
Then, compile and run the code using the provided script:
./compile_and_run.sh
You should see "PASS" printed on the screen multiple
times. If you see "FAIL", don't panic, carefully read the
error message and update your code. Once it compiles and you
get all "PASS" messages from the tester, stage and commit
your work to Git and then merge into the main branch
with the following commands:
git add src
git commit -m "Finished part 5"
Part 6: LinkedStack Constructor
Code Tracing
Draw a memory map for the code below on your exit ticket. Your diagram should include all variables (including instance variables) and objects created.
Stack stack = new LinkedStack();
Solution

Implementation
Implement the following methods with your group:
In LinkedStack:
Constructor
Inspecting the Tests
With your groups, inspect StackTester.java
in the cs1302.test package and answer the
following questions:
How do we reuse this code to test our
LinkedStackimplementation?How many methods should we expect to pass after implementing the
LinkedStackconstructor?
Compile and Run
Compile and run the code using the provided script:
./compile_and_run.sh
You should see "PASS" printed on the screen for the first
few tests and then an exception for the next method we need
to implement. If you see "FAIL", don't panic, carefully read the
error message and update your code. Once it compiles and you
get all "PASS" messages from the tester, stage and commit
your work to Git and then merge into the main branch
with the following commands:
git add src
git commit -m "Finished part 6"
Part 7: LinkedStack Push
Code Tracing 1
Draw a memory map for the code below on your exit ticket. Your diagram should include all variables (including instance variables) and objects created.
Stack stack = new LinkedStack();
stack.push("a");
Solution

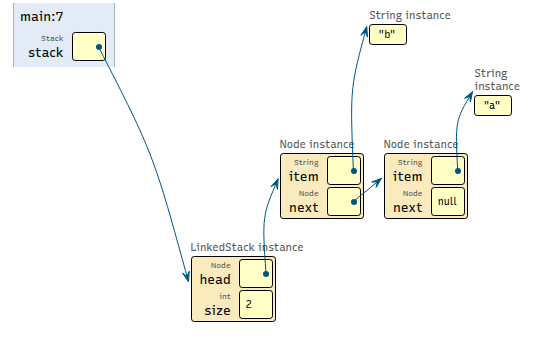
Code Tracing 2
Draw a memory map for the code below on your exit ticket. Your diagram should include all variables (including instance variables) and objects created.
Stack stack = new LinkedStack();
stack.push("a");
stack.push("b");
stack.push("c");
Solution

Fig. 45 This is ONE possible implementation of the ADT. Note: The debugger breakpoint is on line 5.

Fig. 46 This is ONE possible implementation of the ADT. Note: The debugger breakpoint is on line 6.

Fig. 47 This is ONE possible implementation of the ADT. Note: The debugger breakpoint is on line 7.

Fig. 48 This is ONE possible implementation of the ADT. Note: The debugger breakpoint is on line 8.
Code Tracing 3
Draw a memory map for the code below on your exit ticket. Your diagram should include all variables (including instance variables) and objects created.
Stack stack = new LinkedStack();
stack.push("a");
stack.push("b");
stack.push("c");
stack.push("d");


Discussion Opportunity
Should head be the top of the stack or should the end of the list be the top?
Implementation
Implement the following methods with your group:
In LinkedStack:
push
Inspecting the Tests
With your groups, inspect StackTester.java
in the cs1302.test package and answer the
following question:
How many methods should we expect to pass after implementing the
LinkedStackconstructor?
Compile and Run
Compile and run the code using the provided script:
./compile_and_run.sh
You should see "PASS" printed on the screen for the first
few tests and then an exception for the next method we need
to implement. If you see "FAIL", don't panic, carefully read the
error message and update your code. Once it compiles and you
get all "PASS" messages from the tester, stage and commit
your work to Git and then merge into the main branch
with the following commands:
git add src
git commit -m "Finished part 7"
Part 8: LinkedStack Peek and Pop
Code Tracing
Draw a memory map for the code below on your exit ticket. Use the memory map from the last part as a starting point. Your diagram should include all variables (including instance variables) and objects created.
Stack stack = new LinkedStack();
stack.push("a");
stack.push("b");
stack.push("c");
stack.push("d");
System.out.println(stack.peek());
System.out.println(stack.pop());
System.out.println(stack.pop());
Solution

Fig. 54 This is ONE possible implementation of the ADT. Note: The debugger breakpoint is on line 5.
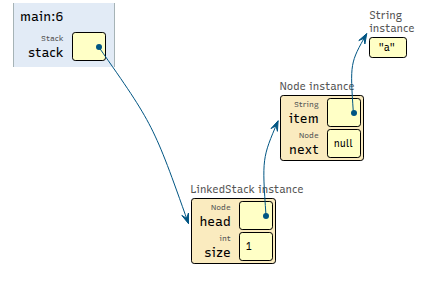
Fig. 55 This is ONE possible implementation of the ADT. Note: The debugger breakpoint is on line 6.

Fig. 56 This is ONE possible implementation of the ADT. Note: The debugger breakpoint is on line 7.
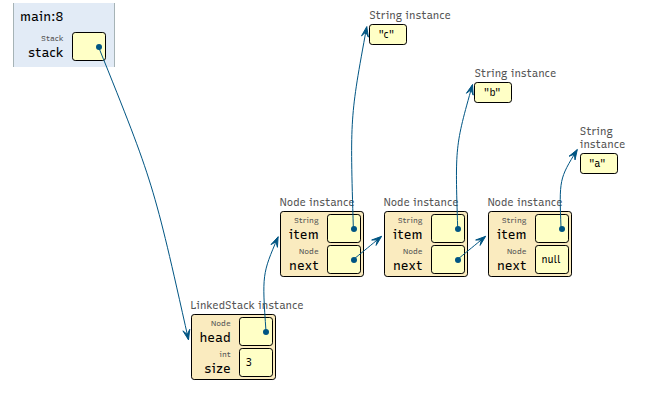
Fig. 57 This is ONE possible implementation of the ADT. Note: The debugger breakpoint is on line 8.

Fig. 58 This is ONE possible implementation of the ADT. Note: The debugger breakpoint is on line 9.
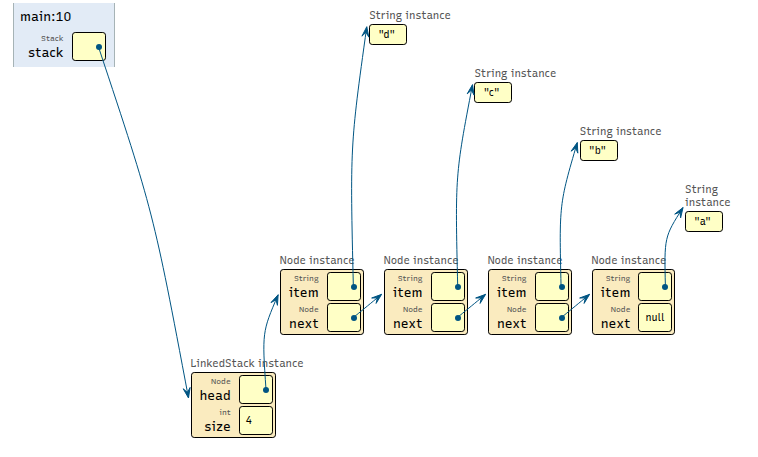
Fig. 59 This is ONE possible implementation of the ADT. Note: The debugger breakpoint is on line 10.

Fig. 60 This is ONE possible implementation of the ADT. Note: The debugger breakpoint is on line 11.

Fig. 61 This is ONE possible implementation of the ADT. Note: The debugger breakpoint is on line 12.
Implementation
Implement the following methods with your group:
In LinkedStack:
peekpop
Compile and Run
If we've done everything correctly, all of the tests
should pass for LinkedStack!
Compile and run the code using the provided script:
./compile_and_run.sh
You should see "PASS" printed on the screen for all tests.
If you see "FAIL", don't panic, carefully read the
error message and update your code. Once it compiles and you
get all "PASS" messages from the tester, stage and commit
your work to Git and then merge into the main branch with
the following commands:
git add src
git commit -m "Finished part 8"
Part 9: toString
If we want to write a toString method to print the size of the stack
and the top item, where should it go?